
- 1. Quickstart for Android
- 2. Enable ARCore
- 3. Run AR Apps in Android Emulator
ARCore 是 Google 为开发者构建的增强现实平台,如何让虚拟物体和真实世界完美融合,这一直是 Google ARCore 技术所探讨的问题。众所周知,当虚拟物体附近有现实物体时,有可能会出现互相交融、重叠等效果,大大地影响了用户体验。这一直是 AR 技术的难点,也是 Google 不懈努力的方向。
1. Quickstart for Android
1.2 Set up your development environment
- Install Android Studio version 3.1 or higher with Android SDK Platform version 7.0 (API level 24) or higher.
- You will need a basic understanding of Android development. If you are new to Android, see Building your first Android app for beginners.
1.3 Open the sample project
This quickstart uses OpenGL, a programming interface for rendering 2D and 3D vector graphics. Review the Enable ARCore documentation before getting started with the steps below.
Get the sample project by cloning the repository with the following command:
1 | git clone https://github.com/google-ar/arcore-android-sdk.git |
In Android Studio, open the HelloAR sample project, located in the samples subdirectory within the arcore-android-sdk directory.
1.4 Prepare your device or emulator
You can run AR apps on a supported device or in the Android Emulator:
- In the emulator, you must sign into the Google Play Store or update Google Play Services for AR manually.
1.5 Run the sample
Make sure your Android device is connected to the development machine and click Run  in Android Studio. Then, choose your device as the deployment target and click OK.

Android Studio builds your project into a debuggable APK, installs the APK, and then runs the app on your device. For more information, see Build and Run Your App.
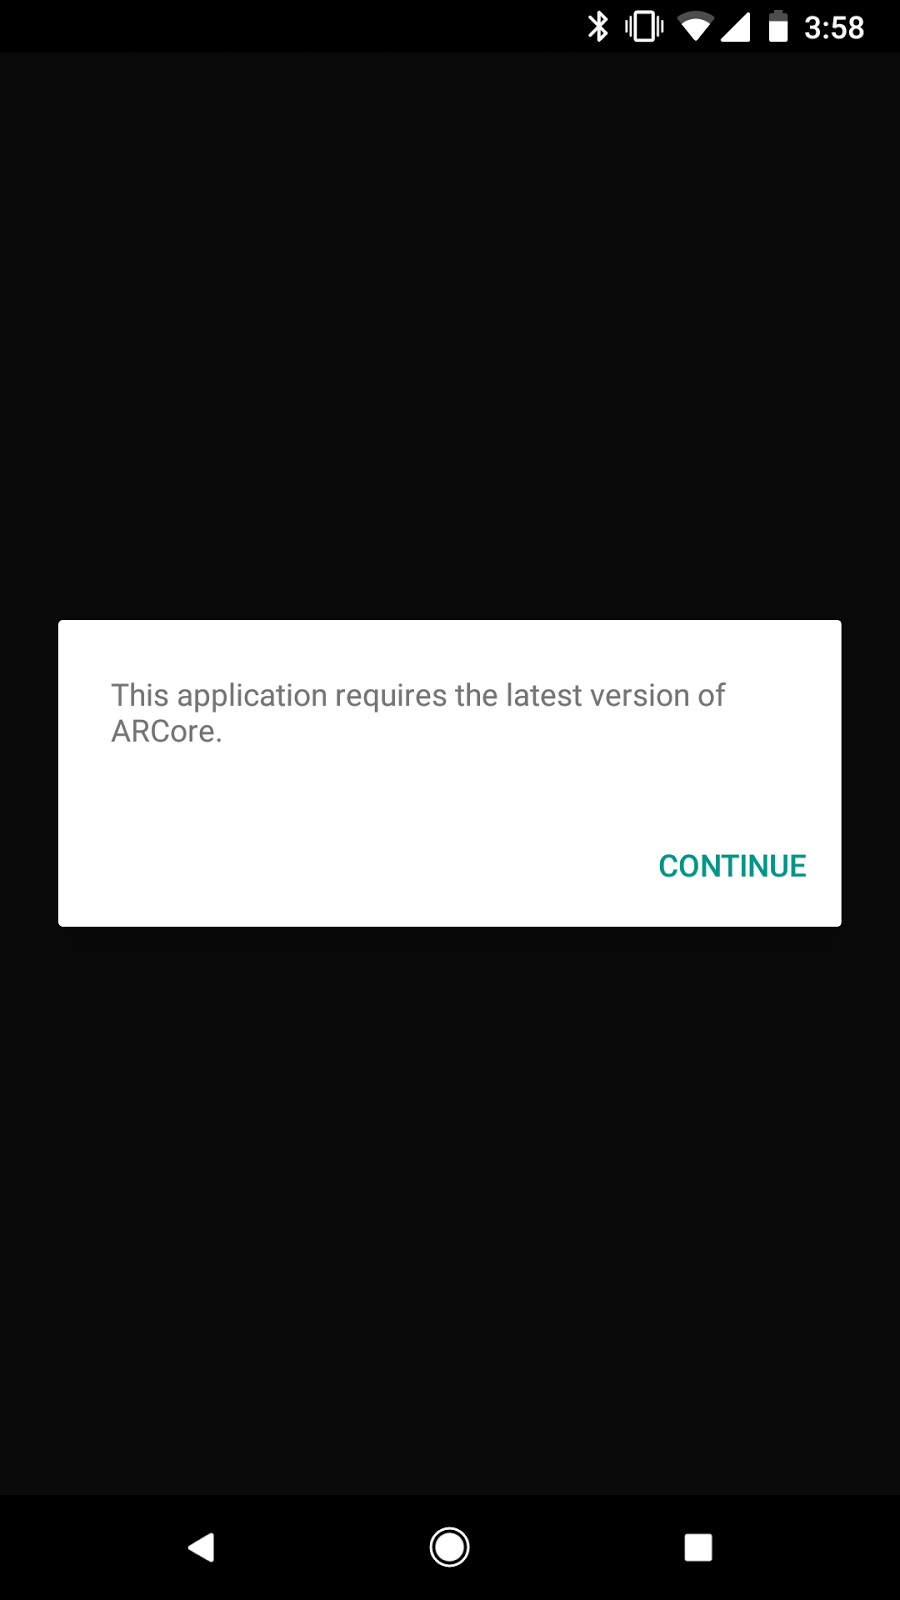
You may be prompted to install or update Google Play Services for AR if it is missing or out of date. Select CONTINUE to install it from Google Play Store.
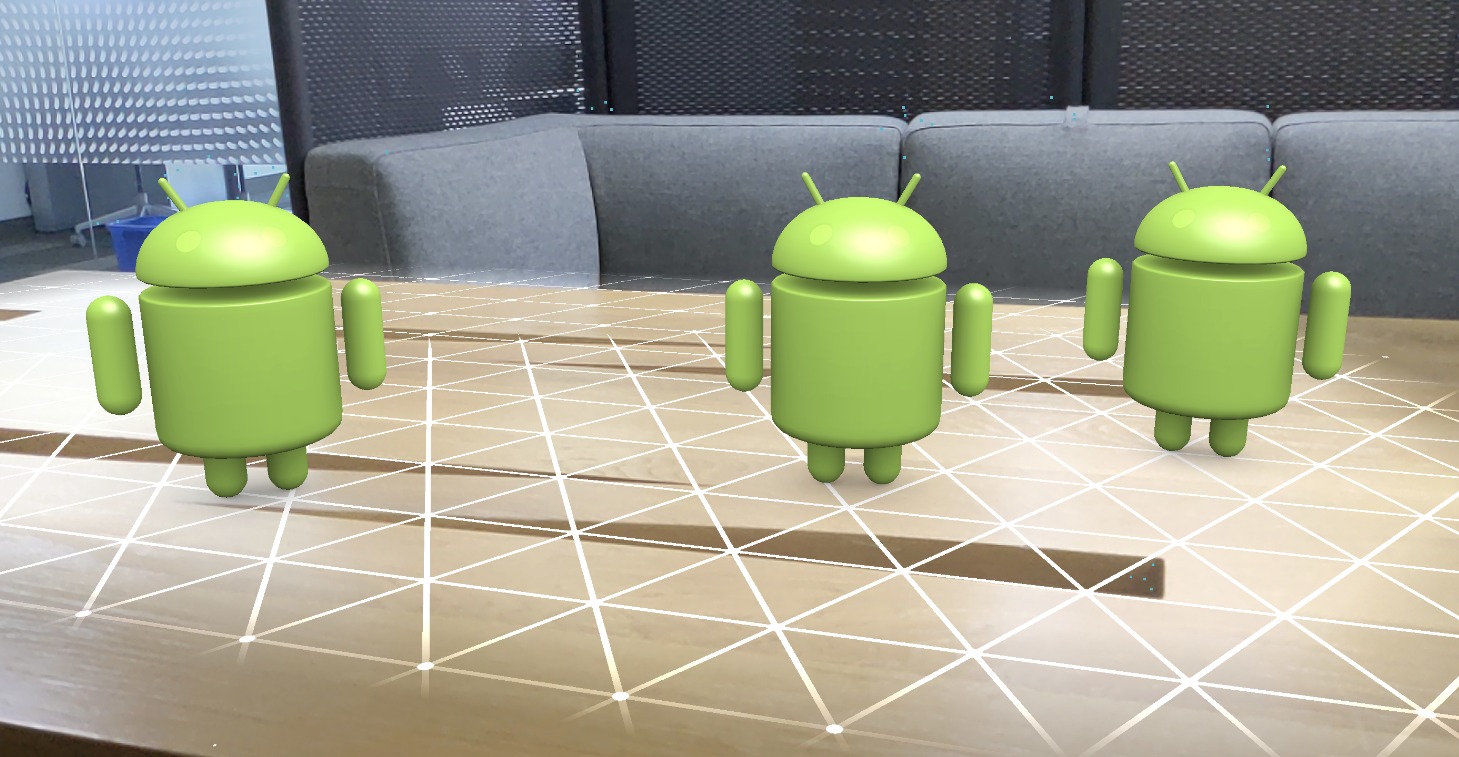
The HelloAR app lets you place and manipulate Android figurines on detected AR plane surfaces. It is implemented with Android GL SurfaceView, which is used to render the camera preview and basic AR objects such as Planes and Anchors. HelloAR‘s render can be found here.
Note: The lifecycle methods in HelloAR are different than those normally found in OpenGL applications. To ensure the correct AR setup for your own applications, follow the lifecycle management logic in HelloAR.
1.6 Next steps
- Try building and running other sample projects in the ARCore SDK.
- Learn how to Enable ARCore in your app.
- Use Augmented Images to build apps that can respond to 2D images, such as posters or logos, in the user’s environment.
- Use Cloud Anchors to create shared AR experiences across iOS and Android users.
- Review the Runtime Considerations.
- Review the Design Guidelines.
2. Enable ARCore
This page describes how to enable ARCore functionality in your Android Studio projects. To do this, you need to:
- Add AR Required or AR Optional entries to the manifest
- Add build dependencies to your project
- Perform runtime checks to ensure the device is ARCore-supported, that Google Play Services for AR is installed on it, and that camera permission has been granted
- Make sure your app complies with ARCore’s User Privacy Requirements
2.1 Using Google Play Services for AR to enable ARCore functionality
ARCore SDKs make AR features available on ARCore supported devices that have Google Play Services for AR installed. Users can install and update Google Play Services for AR from the Google Play Store.
2.2 Add AR Required or AR Optional entries to the manifest
An app that supports AR features can be configured in two ways: AR Required and AR Optional.
2.2.1 AR Required apps
To be usable, an AR Required app requires an ARCore Supported Device that has Google Play Services for AR installed on it.
- The Google Play Store makes AR Required apps available only on devices that support ARCore.
- When users install an AR Required app, the Google Play Store automatically installs Google Play Services for AR. However, your app must still perform additional runtime checks in case Google Play Services for AR must be updated or has been manually uninstalled.
For more information, see Publishing AR Apps in the Google Play Store.
To declare your app to be AR Required, modify your AndroidManifest.xml to include the following entries:
1 | <uses-permission android:name="android.permission.CAMERA" /> |
Then, modify your app’s build.gradle to specify a minSdkVersion of at least 24:
1 | android { defaultConfig { … minSdkVersion 24 }} |
2.2.2 AR Optional apps
An AR Optional app has optional AR features, which are activated only on ARCore supported devices that have Google Play Services for AR installed.
- AR Optional apps can be installed and run on devices that don’t support ARCore.
- When users install an AR Optional app, the Google Play Store will not automatically install Google Play Services for AR with the app.
To declare your app to be AR Optional, modify your AndroidManifest.xml to include the following entries:
1 | <uses-permission android:name="android.permission.CAMERA" /> |
Then, modify your app’s build.gradle to specify a minSdkVersion of at least 14:
1 | android { |
2.3 Add build dependencies
To add ARCore to your Android Studio project, perform these steps:
Make sure your project’s
build.gradlefile includes Google’s Maven repository:1
2
3
4allprojects {
repositories {
google()
…Add the latest ARCore library as a dependency in your app’s
build.gradlefile:1
2
3
4dependencies {
…
implementation 'com.google.ar:core:1.18.0'
}
2.4 Perform runtime checks
2.4.1 Check whether ARCore is supported (AR Optional apps only)
AR Optional apps can use ArCoreApk.checkAvailability() to determine if the current device supports ARCore. On devices that do not support ARCore, AR Optional apps should disable AR related functionality and hide associated UI elements:
1 | @Override |
Note, checkAvailability() may need to query network resources to determine whether the device supports ARCore. During this time, it will return UNKNOWN_CHECKING. To reduce the perceived latency and pop-in, apps should call checkAvailability() once early in it’s life cycle to initiate the query, ignoring the returned value. This way a cached result will be available immediately when maybeEnableArButton() is called.
This flowchart illustrates the logic in the preceding code sample:

2.4.2 Request camera permission (AR Optional and AR Required apps)
Both AR Optional and AR Required apps must ensure that the camera permission has been granted before creating an AR Session. The hello_ar_java sample includes a CameraPermissionHelper class which can be copied into your project and should be called from your AR activity’s onResume() method:
1 | @Override |
Your AR activity must also implement onRequestPermissionsResult(…), as seen in HelloArActivity:
1 | @Override |
2.4.3 Check whether Google Play Services for AR is installed (AR Optional and AR Required apps)
To check whether a compatible version of Google Play Services for AR is installed, apps must also call ArCoreApk.requestInstall() before creating an ARCore session. This prompts the user to install or update the service if needed.
1 | // Set to true ensures requestInstall() triggers installation if necessary. |
This flowchart illustrates the logic in the preceding code sample:

If requestInstall() returns INSTALL_REQUESTED, the current activity pauses and the user is prompted to install or update Google Play Services for AR:
The activity’s onResume() executes again once the user returns to the activity.
2.5 Compliance with User Privacy Requirements
Make sure your app complies with ARCore’s User Privacy Requirements.
2.6 Next steps
- Read the code and comments in the hello_ar_java sample
- Review the Java API Reference
3. Run AR Apps in Android Emulator
Use the Android Emulator to test AR scenarios without a physical device. The Android Emulator lets you run ARCore apps in a virtual environment with an emulated device that you control.
Warning: The Android Emulator does not support ARCore APIs for Depth, Augmented Faces, or Augmented Images. When any of these features are enabled, the camera preview image does not render correctly: the GPU camera texture is entirely black, although UI elements drawn on top of the preview image still render correctly.
3.1 Set up your development environment
Software requirements:
- Android Studio 3.1 or later.
- Android Emulator 27.2.9 or later.
3.2 Get Android Studio and SDK tools for ARCore
Install Android Studio 3.1 or later.
In Android Studio, go to Preferences > Appearance and Behavior > System Settings > Android SDK.
Select the SDK Platforms tab and check Show Package Details.
Under Android 8.1 (Oreo), select:
Google APIs Intel x86 Atom System Image API Level 27, version 4 or later.Select the SDK Tools tab and add Android Emulator 27.2.9 or later.
Click OK to install the selected packages and tools.
Click OK again to confirm changes.
Accept the license agreement for the Component Installer.
Click Finish.
3.3 Create a virtual device with AR support
For more information, see the Android Studio instructions to Create a Virtual Device.
3.3.1 Create a new Android Virtual Device (AVD)
- In Android Studio open the AVD Manager by clicking Tools > AVD Manager.
- Click Create Virtual Device, at the bottom of the AVD Manager dialog.
- Select or create your desired Phone hardware profile and select Next.
- Select an
x86orx86_64system image running API Level 27 or later and select Next.- While physical ARCore devices are supported on API Level 24 or later, Android Emulator support requires API Level 27 or later.
- Only x86-based Android Emulator architectures are supported. Other architectures such as
arm64-v8a,armeabi-v7, are not currently supported. - macOS only with ARCore SDK 1.16.0 or later: Due to a known issue, Android Emulator
x86_64system images are not supported on macOS with ARCore SDK 1.16.0 or later. As a workaround, use anx86system image.
- Verify that your virtual device is configured correctly:
- Click Show Advanced Settings.
- Make sure that Camera Back is set to VirtualScene.
- Click Finish to create your AVD.
3.4 Run your app
Test an ARCore app on an AR-supported virtual device in the emulator. To do this, you can follow the Android Studio instructions to Run an app in the Android Emulator.
Note: To run apps with NDK components in the Android Emulator, your app must be built with x86 ABIs. For an example, see the ARCore HelloAR C sample app.
3.4.1 Update Google Play Services for AR
The version of Google Play Services for AR on the emulator is likely out of date. Follow these instructions to update it:
Download the latest Google_Play_Services_for_AR_1.18.0_x86_for_emulator.apk from the GitHub releases page.
Install the downloaded APK into each AVD you’d like to use:
Start the desired AVD, then drag the downloaded APK onto the running emulator, or install it using
adbwhile the virtual device is running:1
adb install -r Google_Play_Services_for_AR_1.18.0_x86_for_emulator.apk
Repeat these steps process for any additional AVDs you’d like to use.
3.4.2 Control the virtual scene
When your app connects to ARCore, you’ll see an overlay describing how to control the camera and a status bar below the emulator window.
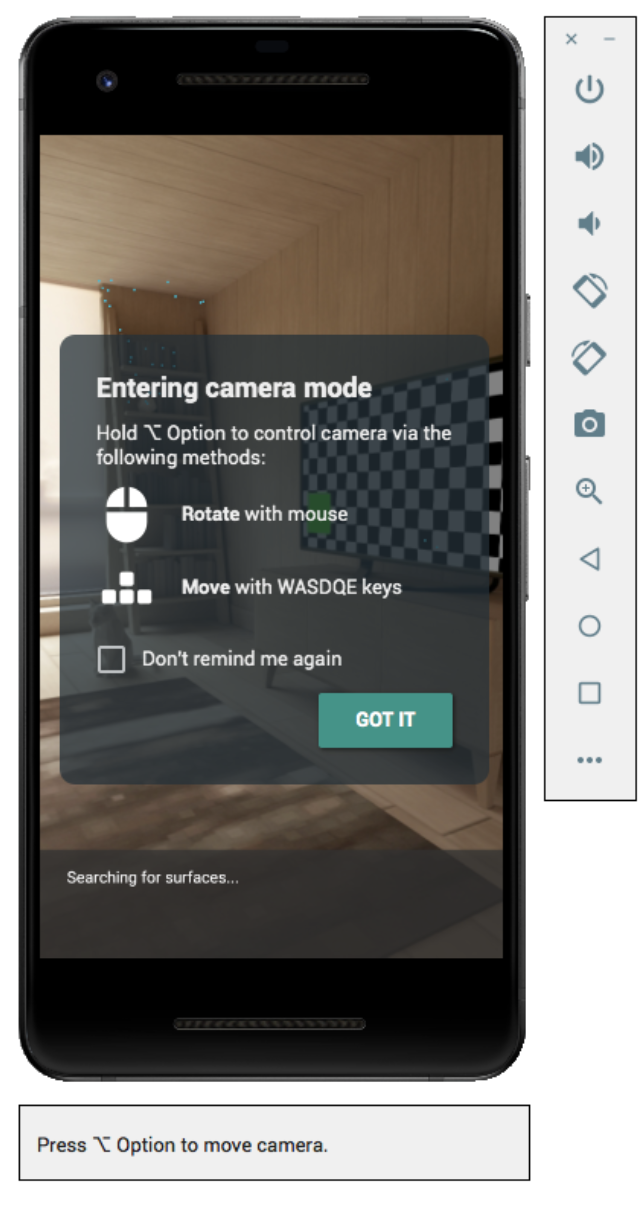
Move the virtual camera
Press and hold Option (macOS) or Alt (Linux or Windows) to access camera movement controls. Use the following controls to move the camera:
| Platform | Action | What to do |
|---|---|---|
| macOS | Move left or right | Hold Option + press A or D |
| Move down or up | Hold Option + press Q or E | |
| Move forward or back | Hold Option + press W or S | |
| Change device orientation | Hold Option + move mouse | |
| Linux or Windows | Move left or right | Hold Alt + press A or D |
| Move down or up | Hold Alt + press Q or E | |
| Move forward or back | Hold Alt + press W or S | |
| Change device orientation | Hold Alt + move mouse |
Release Option or Alt to return to interactive mode in the emulator.
Use the Virtual Sensors tab in Extended controls for more precise device positioning.
3.4.3 Add Augmented Images to the scene
Load images into the emulator’s simulated environment to test Augmented Images.
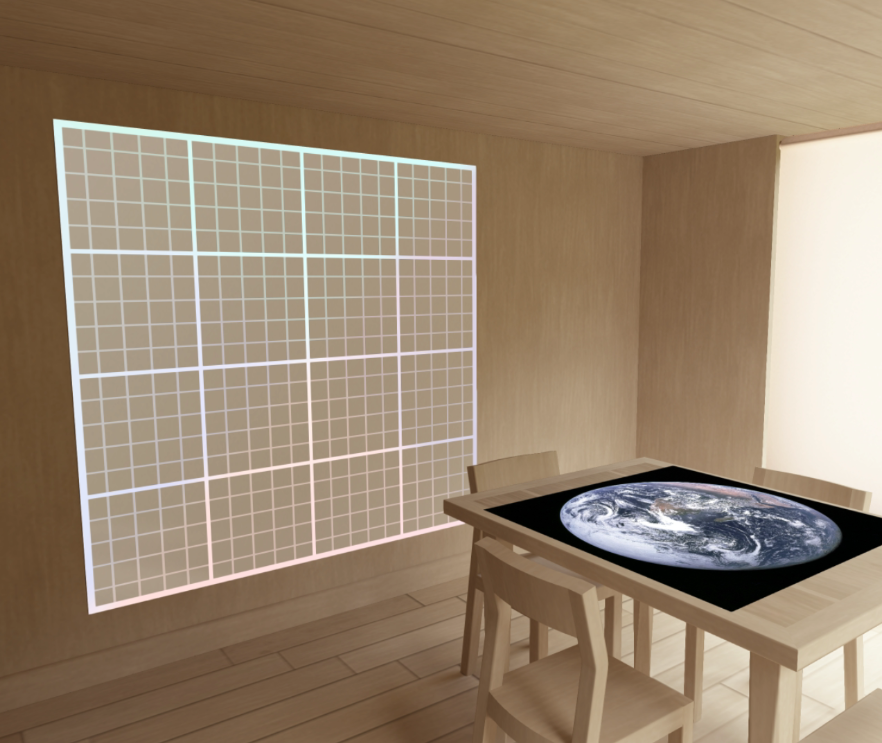 Use the Camera tab in Extended controls to add or modify Scene images. There are two image locations, one on the wall and one on the table.
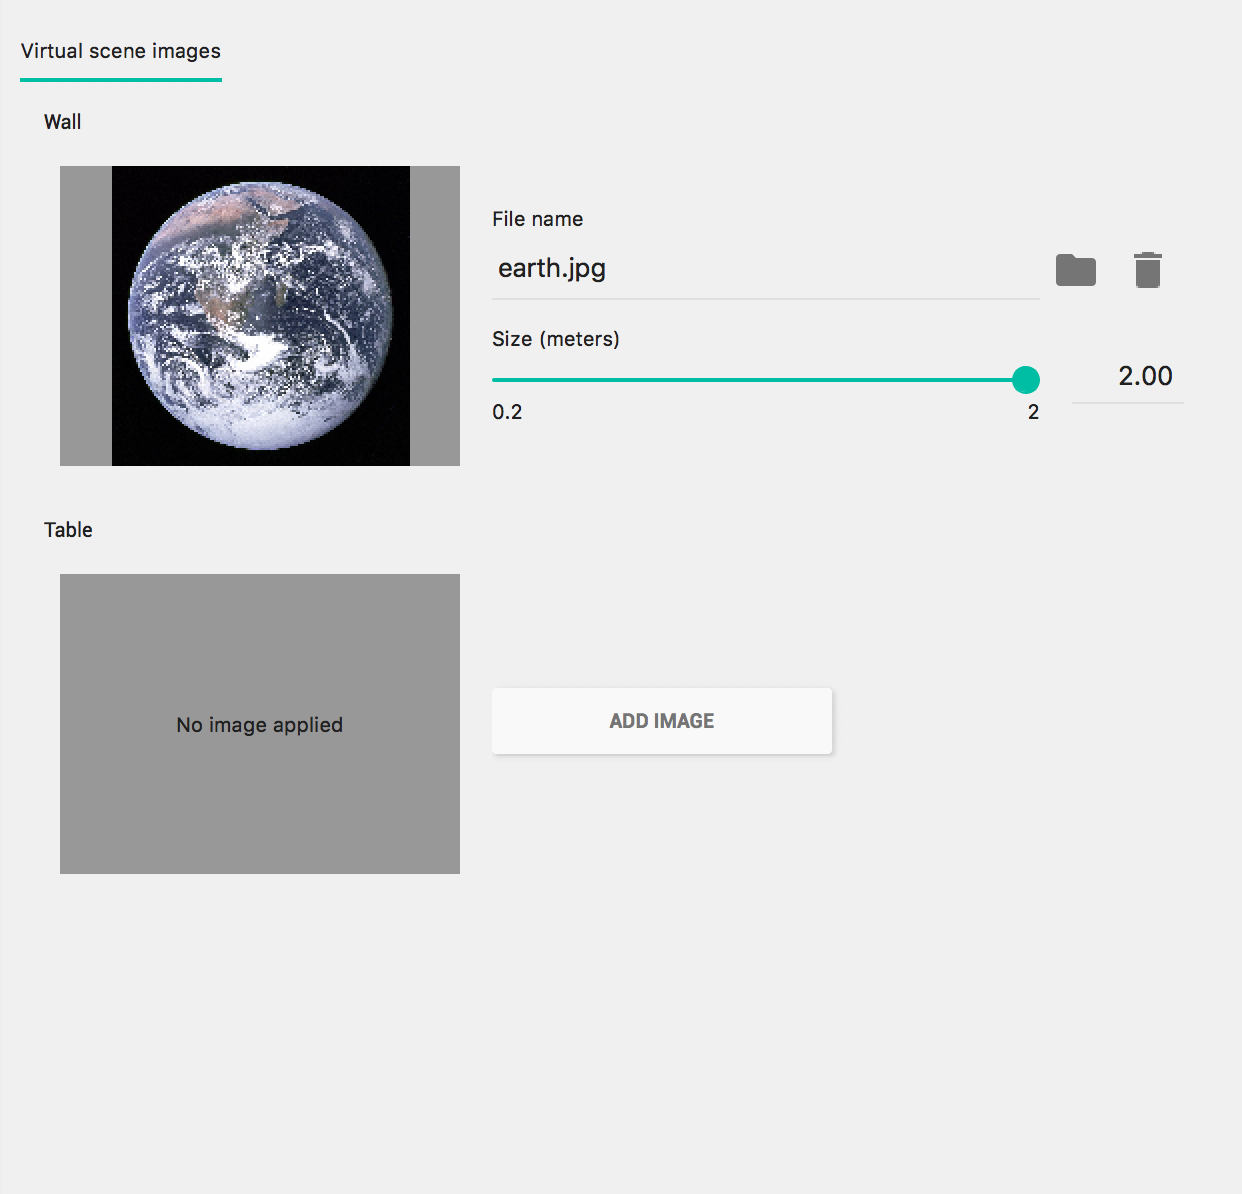
To view these image locations in the scene, launch your emulator, then move the camera to the dining room area through the door behind the camera’s starting position.
3.4.4 Troubleshooting tips
- If your ARCore app launches and you see an “AR Core not supported” message, check the revision on your system image. Make sure you are using API Level 27 Revision 4.
- If your ARCore app fails to open the camera when it launches, make sure that Camera Back is set to VirtualScene, as described in the configuration steps above.